React, Redux and JavaScript Architecture
Whether you use them or not, React and Redux are important. They have changed the way we think about structuring front-end web applications. They can be very powerful. But they are not magic. JavaScript code does not automatically become better just because it uses React. It is easy to write horrible React code, just like it’s easy to write horrible vanilla JavaScript. So, why is React important then? The thing is, understanding how to write React and Redux code is one thing. Understanding why you’d want to use React and Redux is another matter entirely. Once you understand the why of React and Redux, then modern JavaScript starts to make more sense. This is true whatever framework you’re using. Whether it’s React, Vue, Ember, Angular, Web Components, or something else entirely. React and Redux have had a huge impact on how we organise front-end code.1
So, this article might seem long-winded. I do want to show you how to write actual React and Redux code. But it will take a while to get there. And there is a reason. Redux is not terribly complicated. But with Redux (like React), understanding why you’d want to use it is much more interesting than how it works. So, though it might take us a little while to get to Redux, I think the journey will be worth it.
A simple web component
Let’s start our journey by creating a simple web component: A slide toggle. It looks something like this:

The slide toggle can be on, or off. There’s not much to it. The base HTML is only three lines of code. And if we use jQuery, the JavaScript is also around three lines. Nice and simple.
<button class="SlideBtn is-active js-SlideBtn">
    <span class="SlideBtn-knob"></span>
</button>
$('.js-SlideBtn').on('click', (evt) => {
    $(evt.currentTarget).toggleClass('is-active');
});
You can see it in operation on CodePen.
But, things get a little more complicated if we want to make this accessible. At the moment, there’s no way for an assistive device to tell what state the button is in. We need to add some sort of text label. The HTML for doing this is relatively straightforward:
<button class="SlideBtn is-active js-SlideBtn">
    <span class="SlideBtn-label visuallyhidden">On</span>
    <span class="SlideBtn-knob"></span>
</button>
The JavaScript though, is a little more complicated:
$('.js-SlideBtn').on('click', (evt) => {
    const $btn = $(evt.currentTarget);
    const isActive = $btn.hasClass('is-active');
    const $label = $btn.find('.SlideBtn-label');
    if (isActive) {
        $label.text('Off');
        $btn.removeClass('is-active');
    } else {
        $label.text('On');
        $btn.addClass('is-active');
    }
});
With the label in there, we have to update the DOM in two places. That’s fine, but note that there are two ways to tell if the button is on or off. We can either look for the is-active class or, we can look at the button text. In the code above I’ve used the is-active class, but we could just as easily write something like this:
const isActive = ($label.text() === 'On');
So, we’ve stored the state of our button in two places. Essentially, we’re using the DOM to store the state. This is perfectly fine if we’re just coding simple toggle button (like this one). But it becomes a problem if the state gets more complicated. For a larger project, we want to separate our component’s state from the DOM.
Separating state from the DOM
Why would we want to separate our component’s state from its DOM representation? There are two good reasons:
- It’s faster.
- It’s less complicated.
Keeping state separate from the DOM can make our applications faster. Looking up a value in a plain ol’ JavaScript object (POJO) is less expensive than querying the DOM. So, recall our toggle example. Reading whether the toggle is on or off is a fast operation. Much faster than looking up a class name or reading the text value of a DOM node. Sure, it might use up more memory, but only a slight amount. And the improvements in speed can be significant.
A more important reason for separating state from the DOM is that it is less complicated. Here, I’m using ‘complicated’ in the sense of being intertwined.2 By separating state from the DOM, we’re untangling things. In the example above, our toggle button state happens to control two things in the DOM. But we only need to store one bit of information to represent it (literally). If we’re reading from the DOM, it’s possible to be confused over which is the ‘real’ state. Is it the text ‘On’ or ‘Off’? Or is it the class attribute containing is-active? If we separate our state from the DOM there’s less potential for confusion. This might not be such a big deal for a small component like this. But when we have lots of components that all interact, and even share bits of state, it can quickly become a mess.
So, let’s have a go at separating things out. We’ll create a function (called render()) that will take the component’s state as a parameter. Then, given that state, it will work out what HTML should go in the DOM. That should give us a nice clean separation. But, we also need to make sure the click events are processed. So when we render the view, we’ll make sure there’s a click handler in place to change the state. Then, we’ll need some way to make sure we re-render whenever the state changes. So we’ll add a setState() function. We can then make a rule for ourselves that we never change the state directly. Instead, we always call setState(). That way, we’ll never forget to call render() after updating. Finally, to make sure the button is rendered on load, we’ll add an initialise() function. This will kick everything off. The final JavaScript code looks something like this:
function render($container, state) {
    const activeCls     = (state.isActive) ? ' is-active' : '';
    const activeTxt     = (state.isActive) ? 'On' : 'Off';
    const componentHTML =
        '<button class="SlideBtn js-SlideBtn' + activeCls + '">'
        + '<span class="SlideBtn-label visuallyhidden">' + activeTxt + '</span>'
        + '<span class="SlideBtn-knob"></span>'
        + '</button>';
    $container.html(componentHTML);
    $container.find('.js-SlideBtn').on('click', () => {
        setState($container, state, {isActive: !state.isActive});
    });
    return $container;
}

function setState($container, oldState, stateChanges) {
    const newState = Object.assign(oldState, stateChanges);
    render($container, newState);
    return newState;
}

function initialise() {
    const state      = {isActive: false};
    const $container = $('.js-BtnContainer');
    render($container, state);
}

initialise();
You can see it working on CodePen.
Not very pretty, is it? Even so, we’ve managed to separate our state from the DOM rendering. We do have a nice, small setState() function, and a nice, small initialise() function. But it’s far from perfect. We’re throwing away the DOM and re-creating it from a text string on every button click. That’s terribly inefficient. Not only that, but we lose both our focus state and transition animation. This code is longer, slower, and less functional than our jQuery version.
Still, this code doesn’t store our state in the DOM. The idea of saying ‘if this is our state, then render the component like so,’ is a good one. But this naïve implementation is inefficient. Ideally, we’d like to tell the browser ‘make the DOM look like this HTML’. Then, in our ideal world, the browser would do that, fast. Unfortunately, browsers don’t give us that API. So, to make this code fast, we would need some code that compares the actual DOM to the HTML we want. Then we could make API calls that change only the bits of the DOM that need updating. That way, we could keep our separation of state from the DOM, but we still have decent performance.
Writing some kind of automated DOM ‘diffing’ code sounds like a challenging problem. And on top of that, we’ve already talked about how querying the DOM in browsers is a slow operation. But, fortunately for us, some people have thought a lot about this problem. Some clever engineers at Facebook worked long and hard on it. The result is React and the Virtual DOM.3
React
React gives us a convenient way to separate state from the DOM. But without sacrificing too much performance. It does this by keeping its own record of what the DOM should look like (called the Virtual DOM). It runs fast comparisons against the Virtual DOM to work out what parts of the real DOM to change. But for our purposes, we don’t need to know too much about how it works. All we need to understand is that we define our web component a little bit like our naïve jQuery code. We have a render() function that defines our component’s representation. And, we call setState() whenever we want to update the state. React then takes care of all the fancy DOM comparisons and updates for us.
To make all this easier, React defines an extension to JavaScript syntax called ‘JSX’. JSX allows us to write our component representation as if we were writing HTML. Behind the scenes, React4 transforms the JSX into plain JavaScript function calls. For example, it would turn this JSX:
<button className="btn" onClick={toggle}>Click me</button>
Into something like this:
React.createElement(
    'button',
    {className: 'btn', onClick: toggle}
    'Click me'
);
If you don’t like JSX (and some people don’t), it’s fine. You can write React code using React.createElement(). But personally, I find JSX a convenient shortcut that feels like I’m writing HTML.
So, let’s refactor our toggle component to use React:
class ToggleBtn extends React.Component {

    constructor(props) {
        super(props);
        this.state = {isActive: false};
    }

    toggle() {
        this.setState({isActive: !this.state.isActive});
    }

    render() {
        const state     = this.state;
        const activeCls = (state.isActive) ? ' is-active' : '';
        const activeTxt = (state.isActive) ? 'On'         : 'Off';
        return (
            <button className={'SlideBtn' + activeCls} onClick={this.toggle.bind(this)}>
                <span className="SlideBtn-label visuallyhidden">{activeTxt}</span>
                <span className="SlideBtn-knob"></span>
            </button>
        );
    }
}

function initialise() {
    const el = document.querySelector('.js-BtnContainer');
    ReactDOM.render(<ToggleBtn />, el);
}

initialise();
In this version, we’re now creating an ES2015-style ‘class’. In it, we have a constructor() method that sets the initial state. We also have a toggle() method that describes what to do when the button is clicked. And we have our render() method which defines how to display the component. Finally, outside the class definition, we call initialise() to render our ToggleBtn component.
If you check out the CodePen, then you’ll see that our focus state and transition are back. The button glows when focussed, and slides smoothly from one side to the other. Much nicer.
Adding more functionality
Now, our React toggle button is neat, but not terribly useful. It doesn’t do anything other than slide on or off. What happens if we want the button to do something? For example, what if we wanted to change the background colour of its parent <div>? We have to think a little.
For a start, we need to bring the <div> with the background inside our little React application. One way would be to just change our ToggleBtn component and add a <div> around it. But that wouldn’t be terribly flexible. What if we wanted to have toggle switches controlling other things? Or several toggle switches changing the background colour in different ways? It would be a pain to have to copy-and-paste our JSX code all over the place. And not too DRY either. It would be much nicer if we could package up our toggle component so we can reuse it inside other components. Fortunately, React is designed to let us do just that.
React allows us to create a component for our background and nest the toggle button inside it. We’ll call the new background component ToggledBackground. The code looks something like this:
class ToggledBackground extends React.Component {

    constructor(props) {
        super(props);
        this.state = {lightsOn: false};
    }

    render() {
        const bgCls = (this.state.lightsOn) ? 'ToggledBackground-lightsOn' : '';
        return (
            <div className={'ToggledBackground ' + bgCls}>
                <ToggleBtn />
            </div>
        );
    }
}

function initialise() {
    const el = document.querySelector('.js-AppContainer');
    ReactDOM.render(<ToggledBackground />, el);
}

initialise();
We’ve nested <ToggleBtn /> inside our ToggledBackground. It still toggles, but the background isn’t changing. We need some way to tell the button ‘when you’re clicked, do this.’ In other words, a way of passing functions and data from a parent component to a child component. In React parlance, we call these things ‘props’ (short for ‘properties’). We write them in JSX like we would write HTML attributes.
Let’s change our toggle component so it takes an onToggle prop. We’ll call that function whenever it’s clicked:
class ToggleBtn extends React.Component {

    constructor(props) {
        super(props);
        this.state = {isActive: false};
    }

    toggle() {
        this.props.toggleFn();
        this.setState({isActive: !this.state.isActive});
    }

    render() {
        const state     = this.state;
        const activeCls = (state.isActive) ? ' is-active' : '';
        const activeTxt = (state.isActive) ? 'On'         : 'Off';
        return (
            <button className={'SlideBtn' + activeCls} onClick={this.toggle.bind(this)}>
                <span className="SlideBtn-label visuallyhidden">{activeTxt}</span>
                <span className="SlideBtn-knob"></span>
            </button>
        );
    }
}
And then we adjust the ToggledBackground component to pass in the prop. (Note that we use Function.bind() to make sure that this refers to the right component):
class ToggledBackground extends React.Component {

    constructor(props) {
        super(props);
        this.state = {lightsOn: false};
    }

    toggleBg() {
        this.setState({lightsOn: !this.state.lightsOn});
    }

    render() {
        const bgCls = (this.state.lightsOn) ? 'ToggledBackground-lightsOn' : '';
        return (
            <div className={'ToggledBackground ' + bgCls}>
                <ToggleBtn toggleFn={this.toggleBg.bind(this)}/>
            </div>
        );
    }
}
You can see it all together on CodePen.
Our toggle button is doing something at last. It slides and changes the background as we expect. But… the code is not as clean as it could be. We’re now keeping track of the state in two places again. Once in the background, and once more in the toggle button. This is what we set out to avoid. Let’s see if we can clean it up.
What we can do is tell the toggle button whether to be ‘on’ or ‘off’ through a prop. We’ll call it isActive. Here’s how that might look:
class ToggleBtn extends React.Component {

    constructor(props) {
        super(props);
    }

    toggle() {
        this.props.toggleFn();
    }

    render() {
        const props     = this.props;
        const activeCls = (props.isActive) ? ' is-active' : '';
        const activeTxt = (props.isActive) ? 'On'         : 'Off';
        return (
            <button className={'SlideBtn' + activeCls} onClick={this.toggle.bind(this)}>
                <span className="SlideBtn-label visuallyhidden">{activeTxt}</span>
                <span className="SlideBtn-knob"></span>
            </button>
        );
    }
}
Notice some interesting things here. The constructor() and toggle() have become redundant. We’ve removed all the state from our toggle button component. So now constructor() and toggle() don’t have anything to do. We could get rid of everything except the render method.
This scenario is so common that React provides a shorthand for it. We can write our component by just providing its render function. In React parlance, this is called a ‘Stateless Functional Component.’
function ToggleBtn(props) {
    const activeCls = (props.isActive) ? ' is-active' : '';
    const activeTxt = (props.isActive) ? 'On'         : 'Off';
    return (
        <button className={'SlideBtn' + activeCls} onClick={props.onToggle}>
            <span className="SlideBtn-label visuallyhidden">{activeTxt}</span>
            <span className="SlideBtn-knob"></span>
        </button>
    );
}
The ToggleBtn component is now more concise and easier to read. All you need to know, is that its parent passes an isActive prop and an onToggle prop.
Our ToggledBackground doesn’t change much. It passes one additional prop to ToggleBtn:
class ToggledBackground extends React.Component {

    constructor(props) {
        super(props);
        this.state = {lightsOn: false};
    }

    toggleBg() {
        this.setState({lightsOn: !this.state.lightsOn});
    }

    render() {
        const bgCls = (this.state.lightsOn) ? 'ToggledBackground-lightsOn' : '';
        return (
            <div className={'ToggledBackground ' + bgCls}>
                <ToggleBtn onToggle={this.toggleBg.bind(this)} isActive={this.state.lightsOn}/>
            </div>
        );
    }
}
You can see them working together on CodePen
Notice how we’ve taken the state that was down in the toggle and lifted it up a level. This is a common pattern. Working out when, and how high, to lift state, is one of the key challenges of React. If you’re planning on working with React, I recommend reading Thinking in React. It goes into more detail about thinking through state-management and component composition. It’s worth taking the time to understand and apply the concepts described there.
Let’s pause for a moment and consider what React gives us. First, we get modularity and composition. We can compose new components by nesting them inside each other. This builds up a hierarchy that’s a bit like an upside-down tree. The root is at the top, and branches down into smaller sub-components. Second, the Virtual DOM stuff lets us separate our application state from the view layer. When it’s all set up nicely, it’s beautiful. We nest our components, wiring them together with props. Then, we set the state at the top and watch all the subcomponents update like a Jacob’s ladder toy:
But, is this overkill?
Someone might be thinking: “This is all very nice, but it seems like overkill. You can write this whole thing in about 10–15 lines of jQuery.” And that is a valid point. If all we ever built was this single toggle, then it would indeed be overkill. But… what if we had multiple toggles? What if they controlled how several other components behaved? What if changing one toggle turned some other toggles off (or on)? When we smear our state all through the DOM, it soon becomes difficult for anyone to tell what’s going on. What React gives us is a clear separation of state and view.
But, if React is so good, why bother with Redux? That is a very good question. You might not need Redux. Seriously. You should read Dan’s article on why Redux might not be the right fit for your project. But Redux does have benefits. We’ve established that React separates state from view. Redux separates what happened from what do we do about it? This lets us do some neat things. We’ll explore those more in a moment. For now, let’s look at how Redux works.

Redux
Let’s try a thought experiment. Recall how we lifted the state up out of the toggle button and into the parent component. Lifting state makes sense because it avoids duplication. Duplicating state leads to complexity and confusion. Now, what if we went the whole way and moved all our state to the very top of the application? No more refactoring to lift the state up whenever we do something interesting. Instead, we always know exactly where our state is—it’s all at the top.
So, in theory, we move our state to the top of our component tree. The top component parcels out the state to subcomponents that need it. Those subcomponents receive that state as props. And they divide these up again and pass them on to their subcomponents. We have one ‘stateful’ blob at the top. All the other components can be ‘stateless’ components that respond only to props.
But there’s a problem. State isn’t the only thing that we pass to pure components via props. We also pass event handlers. Because sometimes we want to change the way a component reacts to events. We might have one button change the background, and another make an AJAX request. So we pass event handlers as props to define how a component behaves.
But that behaviour might involve changing the state. In fact, most of the time, changing the state is the whole point of having the event handler. So the event handler has to be defined at the very top where the state is. But our button (for example), might be at the very bottom of the tree. So, we have to pass our event handlers all the way down through layers and layers of subcomponents. As you can imagine, this gets tedious. Fortunately, Redux gives us a slightly better way of thinking about the problem.
How Redux Works
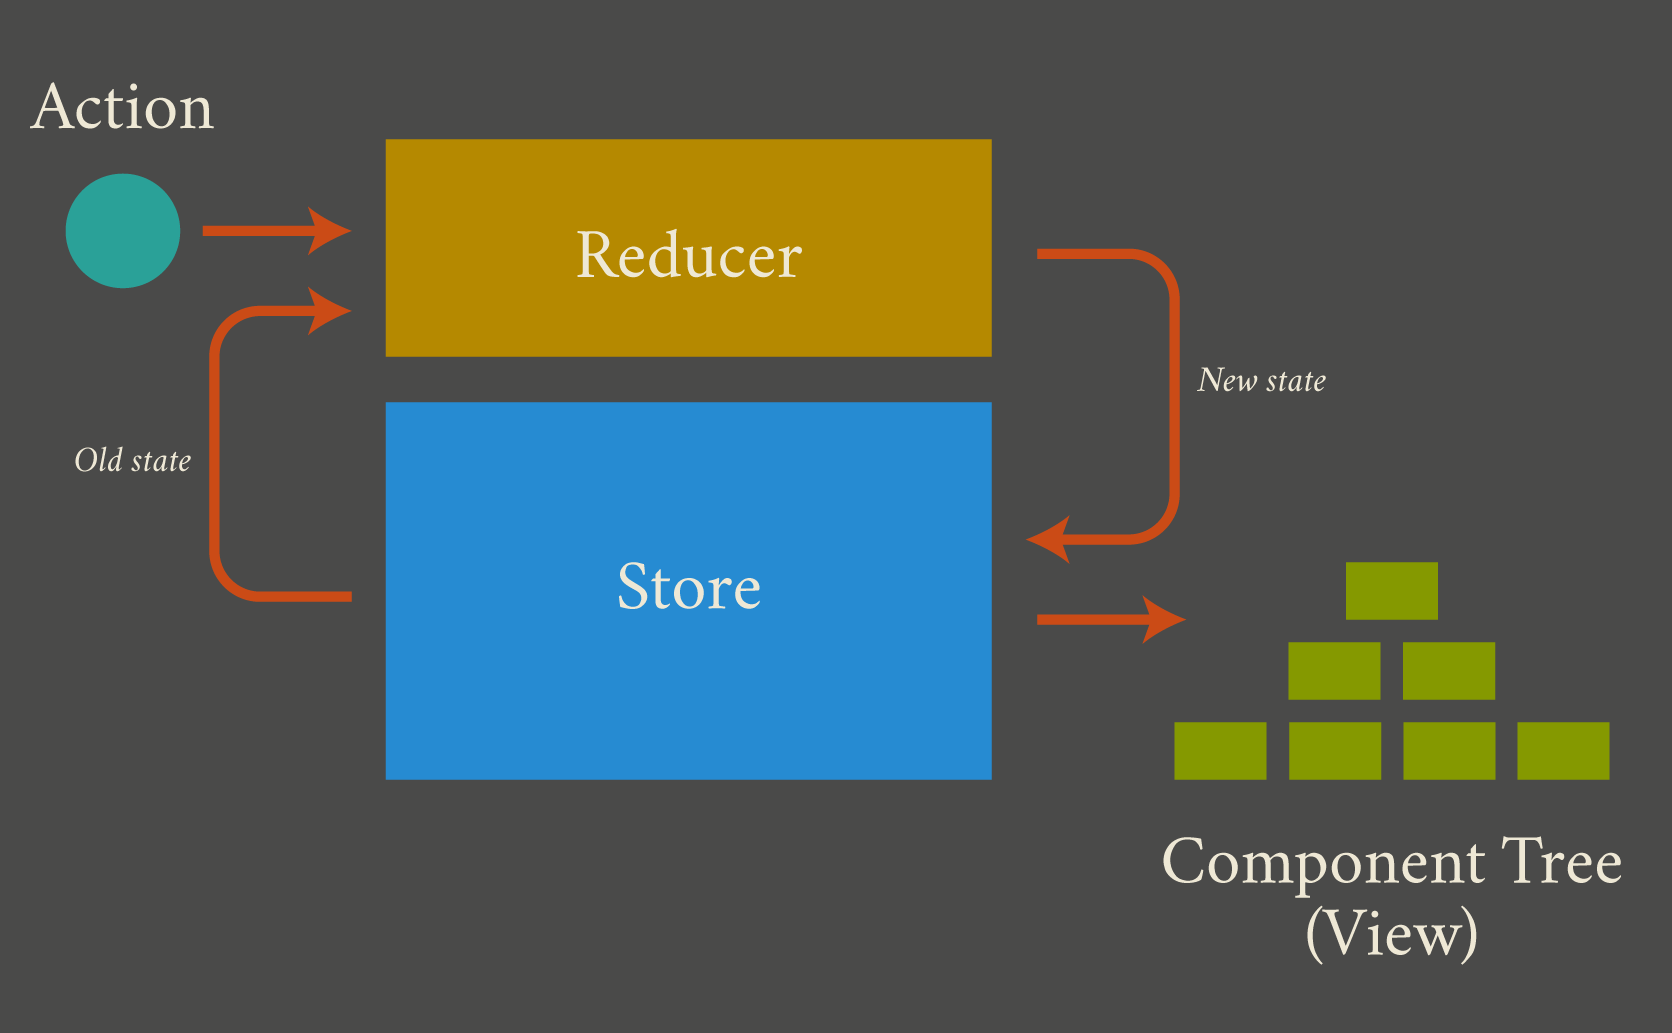
So, we have determined that it would be nice to completely separate our state out from the view. We then have it live in one big blob. React gets us half-way there with nested components and props. But there’s still this issue of threading event handlers down the component tree. The big idea Redux introduces is to split event handlers away from the code that changes state. Instead, all our event handlers do is say “Hey, something happened”. The code that changes the state lives somewhere else.
So, we dumb down all our event handlers. Instead of messing with state, all they do is emit an ‘action’. The action is just a POJO that contains information about what happened. A simple example might look like this:
{
    type:    'BUTTON_CLICK',
    payload: {buttonID: 'foo'}
}
Then, we create a ‘listener’ all the way back up at the top of our application (where the state lives). This listener decides how to change the state in response to different action types. In Redux parlance, we call the ‘listener’ function a ‘reducer’. A simple example might look like this:
function reducer(oldState, action) {
    if (action.type === 'LIGHTS_TOGGLE') {
        return {lightsOn: !oldState.lightsOn};
    }
}
The reducer takes the old state and the action as parameters and returns a new state. If you can understand that, then you’ve understood about 80% of what Redux does. Event handlers emit actions. Then the reducer responds to those actions by changing the state. Redux just handles the plumbing to connect everything together.
In a new Redux application, we start by creating a store using createStore(). It takes a single function as its only parameter: our reducer function. The reducer contains all the logic for changing the state in response to actions. When event handlers dispatch actions, the store catches them. It then passes the action and state through the reducer function. This reducer function then determines what the new state should be.
But how do we connect the store to our React components? Let’s work it through with our toggle button example. The first thing we do is turn our ToggledBackground into a pure functional component:
function ToggledBackground(props) {
    const bgCls = (props.lightsOn) ? 'ToggledBackground-lightsOn' : '';
    return (
        <div className={'ToggledBackground ' + bgCls}>
            <ToggleBtn onToggle={props.onToggle} isActive={props.lightsOn}/>
        </div>
    );
}
All our ToggledBackround component does now is respond to props. It updates the background colour based on the lightsOn property. And it passes through onToggle and lightsOn through to the ToggleBtn component. Nice and simple. But where does onToggle come from? And how do the props get changed?
The react-redux library comes with a special connect() function that helps us out. It handles the connections between state, the reducer function, and actions. It takes care of everything, and only takes three parameters. The first two parameters are functions called mapStateToProps and mapDispatchToProps. We’ll deal with each one in turn.
First, mapStateToProps takes the state and picks out the bits our component needs. Any time the state changes, Redux calls this function. And passes whatever it returns through to the React component as props. For example, in our case, we just need the lightsOn property. So we can write our mapStateToProps function like this:
function mapStateToProps(state = {lightsOn: false}) {
    return {
        lightsOn: state.lightsOn,
    }
}
Of course, it’s a bit redundant for this particular application, but I’ve spelled it out so you get the idea. It’s also considered good practice to always provide a default state. In this case, {lightsOn: false}.
Second, the mapDispatchToProps function lets us define any action generators. That is, if we have any event handlers in our components we want them to trigger actions and update state. So we wire them together in this function. It takes another function, dispatch, as its first parameter. This special dispatch function passes actions to the store. This dispatch function is the only way tell our Redux store that something has happened. If we don’t call dispatch, our action will never be passed to the reducer, and the state won’t be updated.
Like mapStateToProps Redux passes the return value as props to the React component. In our case, we want to pass through an onToggle prop to ToggledBackround. So, we define our action generator and mapDispatchToProps like this:
function triggerToggleAction() {
    return {
        type:    'LIGHTS_TOGGLE',
        payload: null,
     };
}

function mapDispatchToProps(dispatch) {
    return {
        onToggle: () => dispatch(triggerToggleAction()),
    };
}
Finally, we wire everything together with connect. When we call connect, it returns a new React component for us that has everything wired up. We can then use it in JSX like we would with any other React component. ‘Wired up’ components like these are often referred to as ‘Container Components’.
Let’s put it all together and have a look at our application:
function ToggleBtn(props) {
    const activeCls = (props.isActive) ? ' is-active' : '';
    const activeTxt = (props.isActive) ? 'On'         : 'Off';
    return (
        <button className={'SlideBtn' + activeCls} onClick={props.onToggle}>
            <span className="SlideBtn-label visuallyhidden">{activeTxt}</span>
            <span className="SlideBtn-knob"></span>
        </button>
    );
}

function ToggledBackground(props) {
    const bgCls = (props.lightsOn) ? 'ToggledBackground-lightsOn' : '';
    return (
        <div className={'ToggledBackground ' + bgCls}>
            <ToggleBtn onToggle={props.onToggle} isActive={props.lightsOn}/>
        </div>
    );
}


function toggleBackgroundReducer(state = {lightsOn: false}, action) {
    if (action.type === 'LIGHTS_TOGGLE') {
        return {...state, lightsOn: !state.lightsOn};
    }
}

function triggerToggleAction() {
    return {type: 'LIGHTS_TOGGLE'};
}

function mapDispatchToProps(dispatch) {
    return {
        onToggle: () => dispatch(triggerToggleAction()),
    };
}

function mapStateToProps(state = {lightsOn: false}) {
    return {
        lightsOn: state.lightsOn,
    }
}

const ToggledBackgroundContainer = connect(mapStateToProps, mapDispatchToProps)(ToggledBackground);

function initialise() {
    const store = createStore(toggleBackgroundReducer);
    const el = document.querySelector('.js-AppContainer');
    ReactDOM.render(<ToggledBackgroundContainer store={store} />, el);
}

initialise();
So what? Redux seems like a pain.
Now, you may be thinking “So what?” All this has really done is make it more awkward to change the state. Instead of changing state with setState(), with Redux we have to call action generators. Then we have to go somewhere else to manage all the changes in the reducer. It doesn’t seem all that useful, does it? But by making things slightly more awkward we get some surprising benefits.
Remember that there are a couple of rules that all Redux applications have to follow:
- The only way to update the state is by dispatching an action that is passed to the reducer; and
- The reducer must be a pure function. Pure functions do nothing else besides return a value. No AJAX calls or DOM updates. Nothing.
Now, imagine that we hacked the Redux code to change the dispatch function. We change it so that every time an action is dispatched, we store the action in an array. We would then have a record of every single action that happens. With that, plus the reducer and the initial state, then we have everything. We have enough information to reproduce the state of the application at any point. We could go forwards or backwards in time and see everything the user has done. We could create an undo/redo stack. We could send the actions across the network and someone else could watch it all in real time. We could write the action list to a file, then spin up the application on another computer. And then debug the exact same application state. All these things are made possible by those two simple rules.
What’s more, we don’t actually have to hack Redux to do this. Redux itself provides a mechanism to add these ‘hacks’. They’re called middleware. And they’re not only useful for logging actions. They can also be used to make it easier to deal with asynchronous stuff like AJAX requests.
Middleware isn’t the only benefit though. We get some direct benefits from the awkwardness imposed by Redux. In a Redux application, (almost) everything goes through the reducer. This means the business logic for the entire application is condensed into one place. Since this reducer is a pure function, that makes it easy to test. You simply create a state object, pass in an action, and test that the new state is what you expect.
Of course, there’s more to Redux than I’ve shown here. When building larger applications, it’s useful to have many container components. And it’s often convenient to break a reducer up into smaller parts. But all those choices of how to organise code are up to you. Redux is small, simple, and doesn’t care. My aim here is to give you the rough idea of how it works.
Summing up
React and Redux are a pretty amazing combination. And we’ve only scratched the surface of what they can do here. I’ve tried to use concrete examples, so you can see how things work. But in some ways, it doesn’t really matter if you understand the specifics. Understanding why React and Redux work the way they do is the important thing. They have both had a big impact on the JavaScript ecosystem. These concepts have carried over into many other libraries and frameworks. Understanding these ideas can be a real advantage to your front-end development career.